This is a guide to how to use fonts in your page templates. You have several options depending on the types of fonts you want to use
Web safe fonts
You can easily use “web safe” fonts in your pages. These are fonts that are built into most browsers and operating systems. They include fonts such as Arial, Times New Roman and Verdana.
What this means is you can use these fonts very easily without the need to upload them or link to them, e.g. from Google Fonts.
Using web safe fonts in sample templates (Free and Flexible Template 2 Blueprint)

You can choose any of the web safe fonts by simply choosing them in the dropdowns available when creating or editing your blueprint.
CSS method
If you are making your own templates, then you can use CSS to assign these web safe fonts. For example, if you wanted Heading 1 to be Arial, you would add CSS such as:
h1 {
  font-family: Arial;
}
Google Fonts
Google offers a large range of fonts for free that go far beyond the small range of web safe fonts. Visit fonts.google.com to select the fonts you want to use. It could be that your “house font” is listed here already.
Linking to Google Fonts in the sample template (Free and Flexible Template 2 Blueprint)
There are several ways you can use Google Fonts. You can link to Google’s files directly (but note the GDPR warning above), or you can download them. If you wish to download them then read the next section “Uploading Google Fonts or your own font files”.
Here’s an example if you wish to link to the fonts :
- Go to Google Fonts and select the Font or Fonts you wish to use
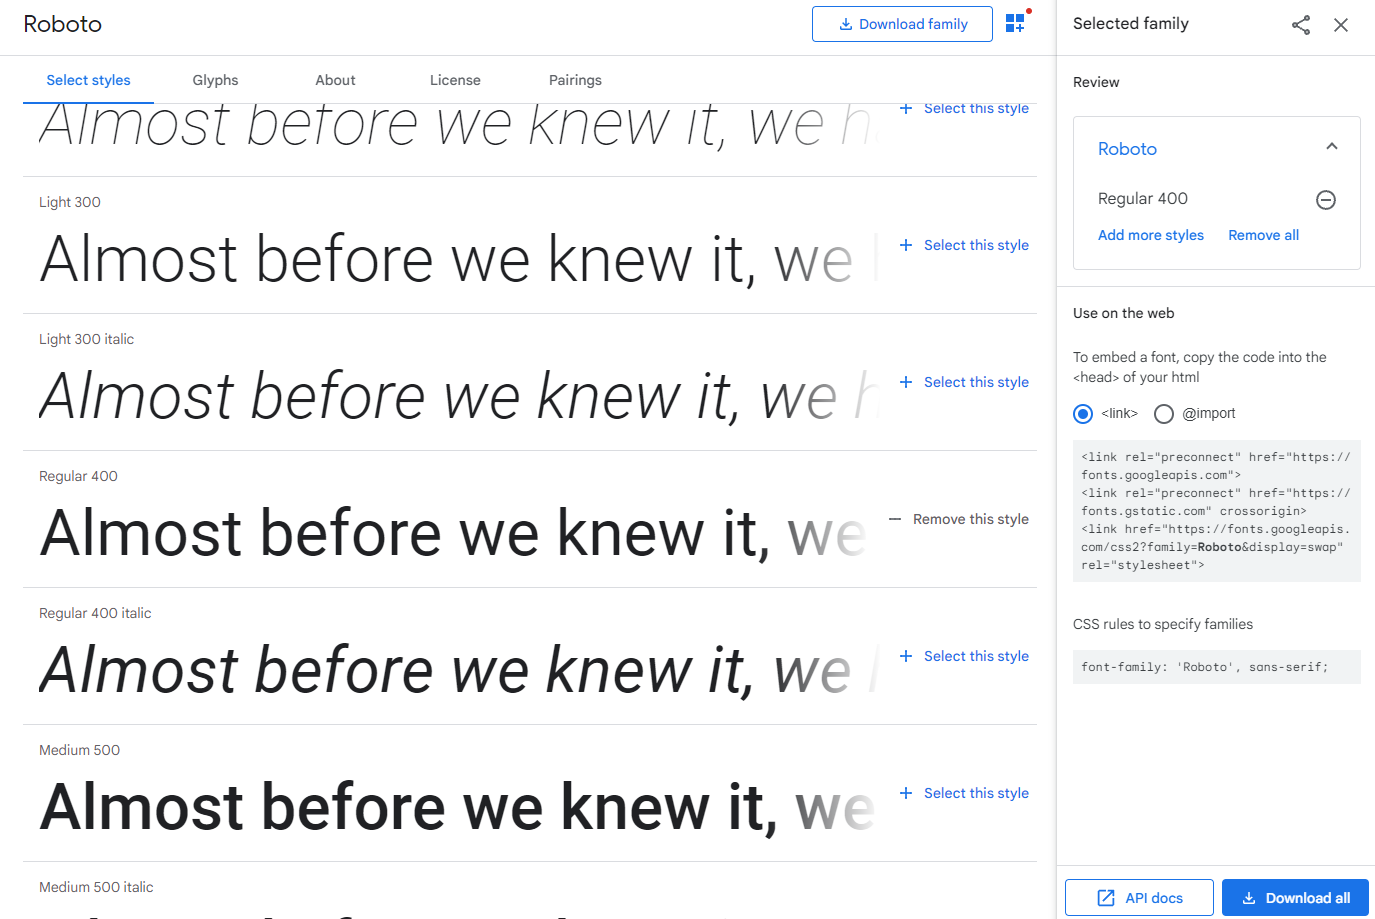
- It will open up a list of available styles. Generally picking Regular 400 is enough but you can add more. Click on “+ Select this style” next to this and any others you want.
- You can add more fonts in this way if desired
- Once done, the right hand panel will show the fonts you have chosen and the code to copy. Under “Use on the web”, copy the long code they give you, for example if you selected Roboto as your font you would copy this code:
<link rel="preconnect" href="https://fonts.googleapis.com">
<link rel="preconnect" href="https://fonts.gstatic.com" crossorigin>
<link href="https://fonts.googleapis.com/css2?family=Roboto&display=swap" rel="stylesheet">
- Paste this into the Custom fonts box, found under Fonts (advanced) in your blueprint template
- Back in Google Fonts, in the same panel, there is another section headed “CSS rules to specify families”. To specify an “Other” font, you need to copy the text after font-family:, for example if it says:
font-family: 'Roboto', sans-serif;
then copy
'Roboto', sans-serif
- To apply this font, select the “Other” option for your fonts and paste it in there, for example the Default Font Family or Heading fonts.
CSS method
If you are making your own templates, then you can use CSS to assign Google fonts. Google gives good instructions on this, but there are two steps:
- Add the <link> code to your <head> area.
- Assign the fonts to your text, for example:
h1 {
 font-family: 'Roboto', sans-serif;
}
Uploading Google Fonts or your own font files
Finally, you can upload a Google Font (avoiding the GDPR issue explained above). Or you can upload your own font files, if your licensing allows it.
This is the most flexible option since it means you can, in theory, use any font for your web page.
Using your own fonts in sample templates (Free and Flexible Template 2 Blueprint)
Follow these steps:
- First of all, you will need the font file or files. It is recommended that you upload the woff2 font or fonts to the File and Image Library in Engaging Networks.
- Collect the URLs of the fonts from the File and Image Library and save them for later.
- In your blueprint template, you will first need to assign the font file to a font name. This requires you to write some CSS such as:
<style>
  @font-face {
    font-family: fancy-font;
    src: url(https://aaf1a18515da0e792f78-c27fdabe952dfc357fe25ebf5c8897ee.ssl.cf5.rackcdn.com/2208/fancy-font.woff2?v=1582628095000);
  }
</style>
Here, “fancy-font” is the name of the font. You’ll need this to assign the font to your text later. The “src” is the url of the font that you saved earlier.
- Paste this into the Custom Fonts box, found under Fonts (advanced) in your blueprint template
- To apply this font, select the “Other” option for your fonts and type in the name of your font where you want it applied (in this case it’s fancy-font). For example you might add it to the Default Font Family or Heading fonts.
- We recommend you add a backup web safe font, in case your uploaded font doesn’t load for some reason. For example, sans-serif or Arial. To do this, you would type something like:
fancy-font, sans-serif
into the Other box. This means it’ll try and load the fancy-font first, and if that fails, it will try the web safe “sans-serif” font instead.
CSS method
If you are making your own templates, then you can use CSS to assign your uploaded fonts. There are two steps
- Add @font-face CSS to assign the font file, for example:
<style> @font-face { font-family: fancy-font; src: url(https://aaf1a18515da0e792f78-c27fdabe952dfc357fe25ebf5c8897ee.ssl.cf5.rackcdn.com/2208/fancy-font.woff2?v=1582628095000); } </style> - And then Assign the fonts to your text, for example:
<style>
  h1 {
   font-family: fancy-font, sans-serif;
  }
</style>