This article is about the step to build a Message when creating a new messaging broadcast. A messaging broadcast is a campaign sent via the Marketing Tools, via Email and/or SMS. It consists of several stages which can be worked on individually (and in any order) until you are ready to send:
- Setup – the name and type of broadcast
- Audience – who the broadcast will go to
- Message – the broadcast message itself
- Testing – testing the message by sending tests to yourself, colleagues or a seed list
- Sending – sending the message
- Reporting – reporting on a sent message
You enter the Message stage after selecting your Audience, although you can come back to this stage or skip others.
Build your message screen
If you haven’t yet created a message, you will see a screen like this:

It will show you a summary of the Broadcast Name and Objective (set in the Setup stage), the Query (set in the Audience stage), and Total Audience based on that query as well as Suppressed supporters (who are selected but won’t receive the email).
You can have additional messages display within the broadcast if you have set up conditional or split test emails.
Creating a message and choosing a template
Below that is a (+) icon where you can create your main “Core” message, as opposed to different conditional or split test versions of the message. Clicking this will give you a choice of “Start from template” which would use a sample template or one of your own templates, or “Clone existing” which allows you to choose a message within this or another broadcast to copy.

If you choose to start from a template, you can use one of our Samples or one of Your Templates if you have created one.

Email builder
Once you’ve chosen to Start From Template or to Clone Existing, you will be taken to the Email builder screen.

This is where you will do the building of your email’s content, along with its subject line, Sender email, Reply to email, and so on.
On the left is a WYSIWYG representation of your email, where you can add, remove or move Blocks, and on the right are aspects of the message’s details split into three tabs – Settings, Global and Content.
Email builder – Settings
The Settings tab is where you set the broadcast’s subject, sender and so on. You will need to set:
- Subject – the subject of the email. Click “Special field” to insert User Data. These use fallbacks which kick in if the insert contains no data, for example “First name” with a fallback of “Friend” or “First name” with an entirely different fallback subject line with a User Data insert.
 Preview text – abbreviated copy from an email that is displayed in supporter inboxes usually next to or underneath the subject line. This is automatically added to your emails when using Marketing Tools. There’s no need to add a placeholder in your template
- Name – the name of the message, used for internal reporting and querying. This is suffixed with ” – Core” for your first main message. If you have additional conditional or split test emails within the same broadcast, this will ensure it is differentiated from them
- Sender – who is the sender of the message. This can be managed via the edit icon within the sender box, or via the Hello menu > Account settings > Accounts emails of the type “Broadcast email sender”. Make sure that the sender’s domain is authenticated
- Reply to – this can be “Same as sender” but you can have a different email address if you want supporters’ replies to not go to the sender. As of release 4.8, you can manage reply to emails – create new, delete or edit existing reply to email addresses.
- Tracking Parameter – the default tracking parameter for links in your message. Campaign links with a tracking parameter of “inherit” will use this value, meaning you can change several links in one go via this setting
- Google Analytics -This will be the utm_campaign value included in your broadcast’s URLs
- Campaign references will appear here too if you are using them
 Preview text – abbreviated copy from an email that is displayed in supporter inboxes usually next to or underneath the subject line. This is automatically added to your emails when using Marketing Tools. There’s no need to add a placeholder in your template
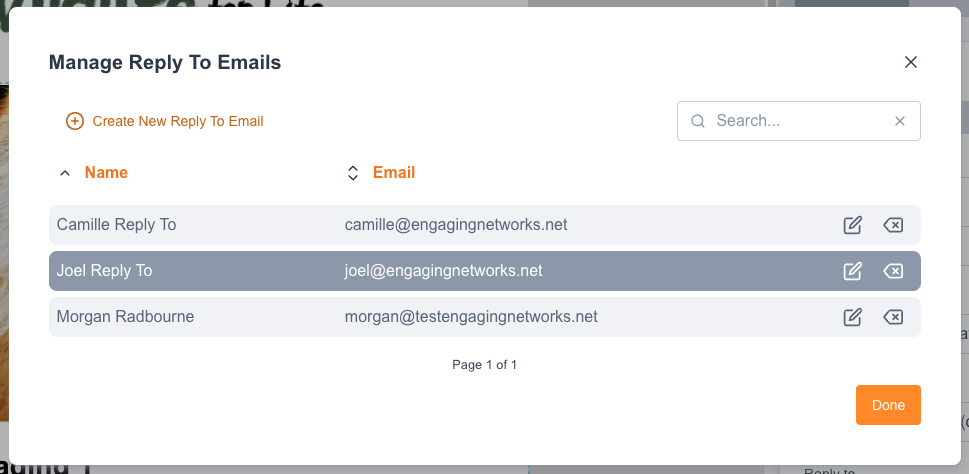
Email builder – Global
This tab shows you the Global template settings. These are fields (known as “replacements”), grouped into categories, that allow you to change certain aspects of the email template, for example its background colour.
What you see here will depend on what template you used to create the email and how the template designer decided it should work. In our Sample templates, you will see things like Logo URL, image, alt text and alignment, along with other design options. In your own templates you will see whatever settings are available (you may not even see anything!).
Email builder – Content
This tab is used when editing the email itself and selecting a Block. For example, for a text block, this area would allow you to edit the text within the block. For an image block, it might allow you to choose the image and its Alt tag.
What appears here depends on how the email template has been designed (for those curious, the bits you can edit are known as replacements).
Moving and changing Block content
If you hover over the email in the left side of the screen, you can see that editable blocks are bordered by a blue box as you move around. Clicking on one of these blocks will select it, and show the changes you can make to this block.
When a block is selected, you will see options in the blue border around it:

- The four arrow icon allows you to drag the block into a different position
- The bin icon deletes the block from the message
- The + icons above and below the block allows you to insert a block before or after it. This will show you a new screen where you can insert either Sample Blocks (for our sample templates), or Custom Blocks which you or your designer has made for your account
- The left-hand icon allows you to add Conditional Content for that block only, based on Profiles
Editing existing block content
The right hand side of the screen will show what content or attributes of the block can be edited when a block is selected. In this example, the user has clicked onto the first text block.

Once it is selected, it will display icons around the block, as well as show the editable parts in the right-hand side under the Content tab.
Editing text “rich text editor” blocks
This editor is shown for blocks that contain editable text.

Simply type into this area to change the content. You can also use the icons to format the text.
![]() – will add Bold, Italics or Underline to the selected text
– will add Bold, Italics or Underline to the selected text
![]() – create bullets or numbered lists
– create bullets or numbered lists
![]() – undo or redo
– undo or redo
![]() – Left align, Centre align, Right align selected text
– Left align, Centre align, Right align selected text
![]() – set the text as normal (paragraph text), add a horizonal rule, or set the text as Heading 1, Heading 2, Heading 3, Heading 4, or Heading 5
– set the text as normal (paragraph text), add a horizonal rule, or set the text as Heading 1, Heading 2, Heading 3, Heading 4, or Heading 5
![]() – unlink the text (if you added a text via the Special Field dropdown)
– unlink the text (if you added a text via the Special Field dropdown)
 – insert a Special field into the email. This can be one of:
- Insert User Data will insert data as a “mail merge” for that supporter from their database record (with a fallback if the data is blank for that supporter). As of release 4.8, the Insert User Data option includes untagged fields in addition to tagged fields.
- Insert Campaign Link will link selected text to an Engaging Networks page (which will pre-populate the page with their data), a Static Page, or an External URL (for example your website or Facebook page). More on this below
- Insert Unsubscribe Link will link selected text to allow the supporter to unsubscribe from an opt-in question by clicking the link, or send them to an email subscription page. More on this below
- Insert View in Browser Link will link selected text to view in a browser and display the email as a web page
Inserting Campaign Links
When inserting a campaign link (via the Special Field dropdown), you will be shown a screen with various options. The URL Type will change the options available on the screen.

- Name: the name of the link for reporting purposes
- URL Type: an Engaging Networks Page, Static Page or External URL.
- Pages: for a URL Type of “Engaging Networks Page”, this will list Live pages you can link to
- Static Pages: for a URL Type of “Static Page”, this will list the Live static pages in your account
- External URL: for a URL Type of “External URL”, this will set the URL of the link. This is recommend for non-Engaging Networks pages
- Start page: for a URL Type of “Engaging Networks Page”, you can also choose to start on Page 2 instead of 1 if you want it to skip the first page (assuming this will be pre-populated. This does not auto-submit a petition though should Page 2 be a thanks page
- Tracking Parameter: for a URL Type of “Engaging Networks Page”, this shows you the tracking parameters available for that page. You can choose “Inherit” if you wish this to take the setting from the main message Settings (see above)
- Append custom URL parameters
- For a URL Type of “Engaging Networks Page”, this allows you to insert your own custom defined parameters to the campaign URL. This option will append the parameter and value you assign to the URL you’re inserting in the email.
- For more complex parameter structures there is also the option to paste custom parameters. That allows several parameters to be pasted to be appended to the campaign URL (rather than appending each parameter individually).
- For a URL Type of “Engaging Networks Page”, this allows you to insert your own custom defined parameters to the campaign URL. This option will append the parameter and value you assign to the URL you’re inserting in the email.


Inserting Unsubscribe Links
To manage your lists correctly you will need to offer your supporters the opportunity to unsubscribe from your list. If you are only using one opt in question, the simplest way to do this is to set up an unsubscribe link is to base it on just that.
In this case, supporters click on the link to unsubscribe, their ‘opt in’ response to your default opt-in question will be changed from a ‘Y’ to a ‘N’. Their record will not be deleted from your account, as they may opt back in at a later date by taking action from your website.
When you highlight your unsubscribe text and click this button, you’ll be presented with two drop downs.
- Opt-in question: Select the opt-in question associated with this unsubscribe link (you might have more than one default opt-in question in your account)
- Landing page: If a supporter does click on the link, they will be taken to a page that confirms that they have unsubscribed. This is either a confirmation page for one-click unsubscribes (set up in Pages > Components > Web pages), or a subscription preferences page, particularly useful if you are using more than one opt in question. Note that you will still need to associate it with a master opt-in. Visit this step-by-step guide for more details.
- Locale: You can also set the Locale of the link here.
Editing other types of blocks
Some blocks have multiple values you can change. For example, our sample button block when selected allows you to change the button’s link, its text colour, and the button text.

A block containing an image will allow you to add an image via the Image Library, as well as an Alt tab and link.

Some blocks may contain a mixture of images and text, which is managed by the designer who has created your template and blocks.
Saving the message
Once done, you can save the message by clicking the Save icon at the top right. It is important to do this regularly.
If there is any missing information that is mandatory, you will taken to the relevant tab which will show a red error next to it. Correct these before saving again.
Closing the message
Once done, click Close. This will prompt you to save the message. Once closed, you will be taken back to the Message stage and you can either edit the message again, or continue to the next Testing stage (or another stage if preferred).
You can also manage audience segments for split tests or conditional messages.

SMS Builder
The SMS Builder is used if you have a Delivery Method of SMS or Email and SMS.
To access the builder, hover over the message item and click Edit SMS.

Message name: An internal name for your message used in queries and reporting.
SMS: Type your message into this box. You can add Supporter Data and links via the “Links & Inserts” blue button
It will show you an approximate message length underneath the SMS box. If it is more than one segment, Twilio will count this as additional messages. Please refer to their pricing for more information.
Note that the opt out text, set in your Twilio extension (under Account settings > Extensions > Twilio – use the SMS icon), will be automatically appended.
Attached Images: Use this to can add images if supported by your Twilio account.
Analytics: If you are using Google Analytics (set under Email Settings) or Campaign References, then they will appear under this tab
